Getting It Right: Why Height and Angle Matter for Trail Cameras
We know a perfectly placed trail camera separates blank cards from great deer photos and reliable scouting intel. Height and angle shape the detection zone, image composition, trigger consistency, and the quality of our data. Small adjustments make big differences.
We use practical, field-tested methods focused on maximizing clear images of bucks and does while cutting false triggers. That means choosing the right height for the situation, angling for natural paths and shoulder shots, and minimizing sun, wind, and brush interference.
In the sections below we walk through optics and behavior, recommended heights by setup, optimal angles, mounting tricks, and simple field tests for peak results. Let’s get started.


Trail Camera Placement Guide: Where and How to Hang for Peak Results
How Camera Optics and Deer Behavior Drive Height Choices
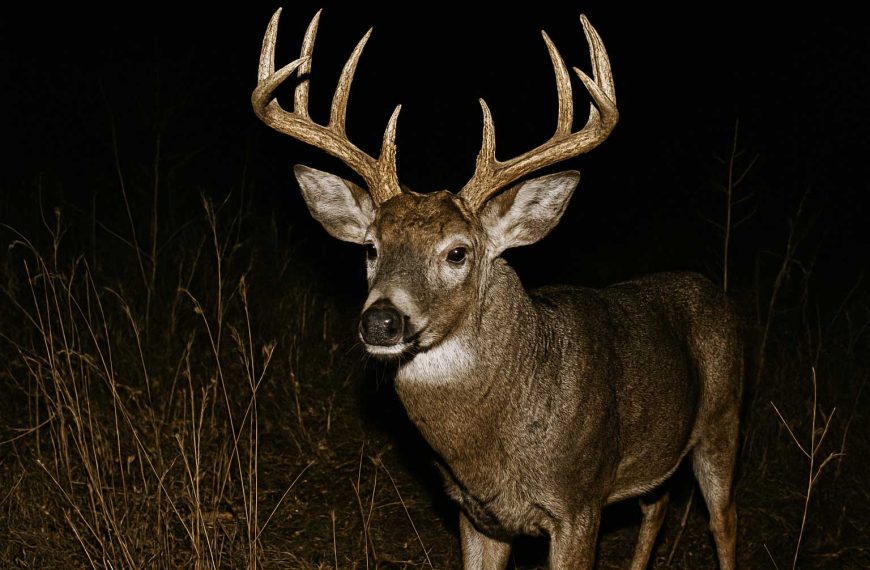
Before we pick a number for mounting height, we first match what the camera does to what a whitetail looks like in the woods. That matchmaking—camera optics vs. deer anatomy and movement—decides whether we mount low for chest/antler detail or higher for full-body ID.
Detection zone vs. picture zone
The detection zone is the invisible cone where the passive infrared (PIR) sensor will trip. The picture zone (what the lens actually frames) is a rectangle inside that cone. If the sensor sees a shoulder but the lens is aimed too high, you’ll get a blank trigger. We always check both specs on the manual: listed detection range, trigger speed, and field-of-view (FOV).
Field of view and focal length — what we watch for
In the field we compare models: a Bushnell Core DS No Glow tends to “reach” farther on the trail, while a Browning Strike Force or Stealth Cam with wider FOV will pick up close, fast-moving deer through a funnel.
Deer body profile, posture, and sensor hits
Whitetail shoulder height and nose-to-ground posture matter. The PIR sensor is most often triggered by:
Seasonally, during summer bedding and early season feeding, the nose and belly are more likely to cross the detection zone; during rut or travel, shoulder-height hits dominate. So match your camera height to the part of the deer you want to register.
Simple field diagrams we use (describe in words)
Quick how-to: check specs, visualize the detection cone, then mount so the deer’s shoulder (for traveling bucks) or mid-body (for feeding/bedding) sits near the centerline of the picture rectangle. When in doubt, lower for chest/antler detail; raise to capture full-body silhouettes.
Recommended Heights by Setup: Trails, Funnels, Food Plots, and Bedding Approaches
We lay out practical mounting heights for the setups we use most and why each range works in the real woods. Think of these as starting points — then fine-tune in the field.
Trails & Funnels — 2.5–3.5 feet (shoulder/chest line)
For established travel lanes and tight funnels we mount lower so the shoulder and antler frame fill the picture. At about 2.5–3.5 feet we consistently get face-on shots and antler detail without missing triggers. On skinny game trails we bias toward the lower end; on wider corridors push toward 3.5 ft to keep the camera from clipping the top of a buck’s head when he raises it.
Quick rules of thumb:
Food Plots & Open Areas — 3.5–4.5 feet (maximize picture zone)
In open food plots we want the camera’s picture rectangle to cover more ground and reduce vegetation triggers. Raising the mount to 3.5–4.5 ft increases the usable range and keeps grass/forbs from entering the frame. With a model like the Bushnell Core DS we’ll often set at ~4 ft and aim slightly downward to capture full-body IDs and multiple deer entering together.
Practical tip: use a narrower FOV lens for distant plots, wider FOV when multiple entry points exist.
Bedding, Scrape & Lick Sites — 1.5–4.0 ft (trade-offs)
These setups are situational. If we want intimate, close-range nose and antler shots at a scrape, a lower mount (1.5–2.5 ft) can deliver dramatic images — but it risks detection by curious bucks. For stealth and to avoid altering behavior we often mount higher (3–4 ft) and use a downward tilt or side angle to keep the camera out of the primary line of sight.
Adjustments for young deer:
Vegetation and season matter — leaf-off allows slightly lower mounts; heavy summer forage pushes us up. Next, we’ll show how to implement these heights with secure, low-profile mounts and best-practice techniques for trees, posts, and stands.
Angles that Work: Facing Direction, Tilt, and How to Reduce False Triggers
Angle often matters more than raw height. We’ve learned that a few degrees of tilt and the right facing direction turn so-so photos into consistently useful scouting images. Below we give the practical rules we use every season.
Tilt: chest-up shots and predictable range
We aim a slight downward tilt — roughly 10–20° — to get chest-up framing on deer at mid-range (10–25 yards). That angle keeps antlers and shoulder in frame, reduces sky in the background, and puts animals squarely in the PIR detection sweet spot instead of on the fringe where triggers fail.
If you want full-body from a food plot, back off the tilt a touch; if you’re tight on a funnel, increase the tilt a little to keep the head and rack centered.
Facing direction: point along travel, not across it
We point cameras roughly down the trail (or at a 20–40° angle along the trail) instead of straight across. That increases the time an animal spends in the detection zone and produces clean broadside or quartering shots we can score. A quick rule:
Avoid facing east at morning sunrise or west at evening — backlighting silhouettes antlers. In the Northern Hemisphere we prefer north or northeast-facing orientations whenever practical.
Reduce false triggers: keep the sensor calm
Wind and moving vegetation are the top culprits. Our checklist:
Special cases: slopes, scrapes, and antler detail
On slopes, mount so the camera body is level; then adjust tilt relative to the deer’s travel. For uphill traffic we sit the camera slightly lower and tilt up; for downhill we go a touch higher and tilt down. For antler detail, use a more oblique 30–45° angle to reveal tine count and mass without extreme close-ups that spook deer. Around scrapes and rubs decide whether you need frontal face shots (place head-on) or rack detail (use a side-oblique) and set tilt to keep the focal range consistent.
Mounting Techniques: Trees, Posts, Ladder Stands and Portable Rigs
We get into the hands-on methods we use to reliably mount and secure cameras in the field. Below are the practical techniques that save us time and headaches.
Tree-strap placement: fast, secure, repeatable
Posts & open-terrain mounts
When trees aren’t available, we use T-posts, wooden posts, or metal poles:

Quick-deploy mounts for food plots
We carry lightweight quick-deploy rigs (expandable pole mounts, cam-buckle tripod sticks) for seasonal plots:
Ladder & climbing-stand mounting
Mounting on stands needs small tweaks:
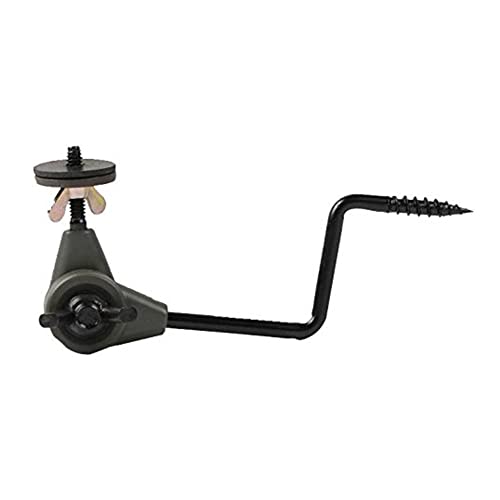
Leveling, anti-sway, and precise tilt
Security, scent-control & camouflage
High vs low mount tradeoffs
Higher mounts reduce theft risk and get broader views but increase detection distance and may lose rack detail. Lower mounts give consistent chest-up images but invite theft and curious hogs. We often compromise: mount slightly higher, angle down with a pivot mount, and add a cable + camo wrap for best of both worlds.
Next, we’ll test these setups in the field and show how to troubleshoot common issues.
Field Testing, Troubleshooting, and Fine-Tuning for Peak Results
Once the camera’s on the mount, the real work begins. We follow a tight, repeatable test routine so we don’t drive back to the truck twice. Start by putting the camera into walk-test or PIR-test mode, then do staged passes from the anticipated travel line at slow, medium, and brisk pace. Note where the unit first triggers, how many frames it captures, and whether the framing gives a clear neck/antler view.

Walk-test checklist (do this every time)
Interpreting early card photos
If deer are cut off at the chest, lower the camera 6–12″; if you only get feet or too much sky, raise or tilt down. Blown highlights at dawn? Rotate the camera 15–30° off direct sun. If you get random false triggers, look for heat/reflective sources in the frame (rocks, sun-warmed plastic, moving branches).
Common mistakes and quick fixes
Seasonal adjustments & settings
During the rut we shorten delay, increase burst length (3–5 shots), and run minimal recovery time—we want multiple angles of a cruising buck. In late season, lengthen delay, reduce sensitivity slightly in extreme cold (PIR can be finicky), and run time-lapse on food plots to capture sporadic midday activity.
Batteries, SDs and the pre-leave routine
Before leaving a site we:
Advanced tweaks
Run the tests, make one change at a time, and record results. With that discipline we rarely come back to an empty card — and we’re ready to fine-tune placement in-season before moving on to final conclusions.
Putting It All Together — Confident Camera Placement for Hunting Success
We summarize the core rules: match height to the setup, use angle to control detection and picture zones, test and tweak, and secure the gear. With optics-driven height choices, recommended heights for trails, funnels, food plots and bedding approaches, plus proper mounting and field-testing routines, we give hunters steps to improve trail-camera results and make smarter stand and scouting decisions.
Get out, try several placements, and refine them based on what our cameras tell us. When we combine methodical mounting with testing, our scouting becomes accurate and our season productive.

Great write-up — finally someone put the reasoning behind height and angle into plain English.
I tried mounting at eye-level once and got nothing but squirrels and a raccoon parade 😂
Switching to the HME 360° tree screw mount helped a ton; the 360 rotation made dialing angle so much faster.
Quick question: when you say “tilt down slightly for trails,” how many degrees are we talking? 5–10°? 15°?
Also, loved the tip about reducing false triggers by angling away from sun-facing lanes.
Agree on the HME — quick install. If you’re worried about exact degrees, a little phone app with an inclinometer works great for a fast check in the field.
Phone inclinometer tip saved me last season. I aim for ~8° on single-track trails and have seen consistent mid-body pics.
Thanks, Emily — glad the article helped! For trails I usually recommend 5–10° downward tilt for mid-distance detection (10–35 ft). For funnels or food plots where deer are closer, 10–15° can be better to get chest/neck shots and avoid sky triggers.
I ran into a weird problem this summer: tons of false triggers at dusk despite angling the camera away from the path of the sun.
Turned out to be reflective leaves and moving grass in the near foreground — proof that detection zone cleaning matters as much as the mount.
Swapped to an ORIPIK double ball-joint on one setup and used a small strip of camo mesh to mask the immediate foreground; triggers dropped by ~60%.
Also, anyone else paranoid about theft? I started using a lockbox with the TreeDude4 on high-traffic access points.
Excellent troubleshooting, Carlos. Foreground motion is a classic false-trigger culprit. The camo mesh trick is a good tip. For theft, adding a small cable lock and hiding the camera at a slightly higher mounting height (but still angled correctly) reduces visibility without hurting capture rates.
Camo mesh is genius — I usually clip a small branch or two to mask the foreground instead of removing it completely. Works most of the time.
Lockboxes work but can be heavy. I use a small cable + kevlar strap and park the camera on the north side of the tree so it isn’t the first thing people see.
Field-tested a bunch of the mounts mentioned here (Camojojo bracket, SPOODOR ground mount) over two seasons.
My take: ground mounts like SPOODOR are unbeatable for food plots — you get stable angles and low-profile placement.
Camojojo is perfect when you need to move quickly between spots.
One tip: always mark the tree height you like with a small ribbon so you can replicate the same height/angle on future checks.
Thanks for sharing your field results, David — that’s the kind of real-world feedback readers love. Marking tree height is a simple but powerful reproducibility trick.
Ribbon idea = why haven’t I done this sooner? 😂 Doing it next weekend.
Notch the bark? I try to keep trees as untouched as possible — ribbon on the north side usually works for me.
If you’re worried about ribbon theft by curious hikers, use biodegradable twine or a tiny notch in the bark at the measurement point instead.
Solid article, but one thing I wish it covered more: strap mounts vs screw mounts durability in wet climates.
I use the TreeDude4 alloy strap mount, and it’s held up great here in the PNW, but I did have one plastic mount crack last year.
Anyone else had strap slippage after heavy rain?
Good point — straps can loosen on certain trees after repeated wet/dry cycles. With TreeDude4 and similar alloy strap-compatible mounts, I recommend checking the strap tension every 4–6 weeks and using a secondary zip tie for peace of mind if you expect heavy weather.
Yep — had straps slip on a big maple last season. Switched to the SPOODOR ground mount for that site and haven’t worried about strap issues since.
Really appreciated the optics + behavior section. A couple of technical notes from my side:
– If your camera has a narrower FOV, you should raise it a bit higher to keep the detection zone centered with the lens.
– For wide-angle cams, lower can be better to avoid too much sky in the frame.
I tested the Stealth Cam expandable multi-pivot mount with a couple of lens types and the adjustability made dialing in the angle much faster.
Question: any thoughts on how to balance trigger speed vs flash power when placing at 20–30 yards?
I had a camera that kept getting blurry pics at night at 25 yards — turned out the flash power/recycle was too slow. Switched settings and improved a lot.
What model were you testing, Raj? Different cams behave wildly.
If folks want, I can add a quick table in the article comparing recommended heights/angles per FOV and typical flash settings. Would that help?
Great observations. At 20–30 yards most builders choose a mid-powered IR flash with faster trigger. If you want color night shots, boost flash power but expect slower recycle times. For accountability, lean toward trigger speed if you want more frames for movement analysis; boost flash only where identification is critical.
I was using a mid-range cam with adjustable flash output. The Stealth Cam mount was clutch for fine-tuning. Model was one with a 50° FOV — narrower than some but not extreme.
This was entertaining and useful. I especially liked the “facing direction” section — who knew deer were such drama queens about sun glare? 😆
Tried the Camojojo 360° bracket and it made moving cameras between trees stupidly easy.
Tiny nitpick: the photo of the ladder-stand mount looks like it was attached upside-down? Or am I losing it?
Follow-up: just reviewed the image, and you’re right — the stance could confuse new users. We’ll replace it with a clearer step-by-step shot showing the correct orientation.
You’re not crazy — I noticed that too. The hinge orientation in the photo made it look inverted; functionally it still works but not the clearest visual.
If it was upside-down that could explain weird angles some testers reported. Good catch, Olivia.
Ha, deer + glare = drama! Glad Camojojo worked for you. We’ll check that ladder-stand photo — thanks for the eye. If it looks off we’ll update it.
Short and sweet: ladder stands + ORIPIK ball-joint = lifesaver.
No more guessing during setup — I can swivel, tilt, and lock in one minute.
Thanks for including portable rig tips!
Glad that combo worked for you, Samantha. The double ball-joint mounts are perfect for ladder stands where fine movement and lockability matter.
Agreed. ORIPIK made my season setup way faster. Just be sure to tighten the knobs — vibration can loosen them over months.